
I am pleased to announce the launch of the redesigned Kitchen Guy Recipe Archive, a compendium of all of the recipes I have cooked on my television show for the past 10+ years.
You will find the Archive easier to navigate in addition to having a search utility that allows you to enter an ingredient or a recipe title.
Another new feature is a print and PDF converter.
Thanks to my tech guy, Damon C., for carrying the lion's share of the load. All I did was retype and make corrections.
To access the new archive, go to http://kitchenguyarchive.com.
Monday, October 21, 2013
Friday, October 18, 2013
Oops. I Did It Again.
With apologies to Ms. Spears, I'm referring to another recipe I did involving Brussels sprouts because the hatred for them is legendary.
That's generally because your mother cooked them until they were dead and gray.
This week, I decided to deep fry the leaves, a process that requires a bit of precision work. First you must chop off the stem and remove the discolored outer leaves. The best Brussels sprouts have inner leaves that cling tightly to the layer of leaves beneath them, so you've got to exercise a bit of care to loosen the leaf enough to peel it off and have a whole specimen to plunge into hot oil.
As you'll hear in the video, I suggest that you keep the inner parts of the sprouts you've peeled to make another of my "turn the Brussels sprout hater into a Brussels sprout lover" dish. I was referring to the one that aired a few weeks ago that I call "Brussels Sprout Hash."
And now I can add a disclaimer or an admission of error in calling that dish "Hash." It has no potatoes. It does have bacon. But no potatoes. So it's technically not a hash. Does anyone, except the Culinary Institute of America really care?
The dipping sauce for this week's dish is quite spicy and if I could change one thing, I might add some extra honey to thicken it a bit more so it could cling to the leaves that turn into "chips" once they've been deep fried.
There's also a caution for you in my dialogue and that regards the high water content of the leaves and what happens when you drop them into a pot of oil that's at 350 degrees. They splatter and that hurts when it splatters on you. So you can use a pot lid as a shield of sorts until the splattering settles down.
I bought one of those home deep fryers a while ago and it actually allows you to close a lid at the same time you lower the fry basket into the oil. That certainly would take care of the splattering.
So here's the video followed by the recipe. And I promise: no more Brussels sprout recipes for at least a year.
1/2 lb Brussels sprouts
3 tsp honey
1 tsp Sriracha sauce
1/2 tsp Thai sweet chili paste
2 tsp lemon juice
1/4 tsp sesame oil
1 tsp sesame seeds
canola oil for frying
Trim off the bottoms of the sprouts and discard the outermost discolored leaves. Pull off and set aside the next two layers of leaves, reserving the hearts for another use.
Make the sauce: whisk together honey, Sriracha, chili paste, lemon juice, sesame oil and sesame seeds in a small bowl and set aside.
Meanwhile, pour about 2 inches of oil in a pot and heat to 350º. Fry the sprouts in three batches, using the lid of the pot to protect your hands and face from popping oil. Cook for about 30 seconds or until the leaves are brown and risk. Drian on paper towels and sprinkle with flaky sea salt.
Once all of the batches are fried, transfer the chips to a bowl and drizzle some of the sauce over them. Toss lightly to coat and add more sauce if needed. Or pass the chips and let every one dip their own.
Saturday, October 12, 2013
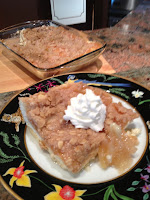
Apple Lasagna - Am I Kidding?
No. It's for real. A lasagna for dessert.
Pasta sheets are made from dough, aren't they? Of course they are. Pie crust is made from dough. Isn't it? Yep.
So what's all the fuss?
 There are some purists out there who took me to task for messing with the Italian classic. But this isn't the first time I've messed around with classic lasagna. A number of years ago when I first started doing the weekly Kitchen Guy program, I made a crab meat lasagna -- probably one of the most expensive dishes I've ever made on the program. Do you know how much crab meat you have to use to fill a 9x13 baking dish?
Anyway, I decided to give this a whirl and treat the apple lasagna as if it were a hybrid between a pie and a crumble, hence the topping made from quick-cooking oats, butter and brown sugar. I could have added nuts and raisins -- hey -- that's a great idea! Next time I make it, I'm going to add nuts and raisins.
Seriously, if you want to surprise the family or dinner guests with an unusual dessert, this will do it. It has all of the elements of a lasagna, with the apple pie filling (I used the canned stuff found in the baking aisle of the supermarket, but you can certainly make your own), as a substitute for the meat and sauce; the lasagna sheets, of course, and the cheese filling.
In my traditional lasagna, I use a combination of cheeses, but I chose to use only ricotta. I suppose I could have used mascarpone, as it is already sweetened. But ricotta seemed the logical choice to keep up the lasagna-like appearance of the dessert.
So while you'll never find this dessert in any self-respecting Italian restaurant, it's perfectly acceptable to serve it in our homes. don't you agree? After all, we want to eat stuff that tastes good. And this dessert really tastes good. Here's the video, followed by the recipe.
8 lasagna noodles (uncooked)
2 20-oz. cans apple pie filling
1 32-oz. container Ricotta cheese
2 large eggs, beaten
1 tsp almond extract
1/4 cup sugar
6 Tbsp flour
1/2 tsp ground cinnamon
3 Tbsp unsalted butter
6 Tbsp brown sugar
1/4 cup quick-cooking oats
freshly grated nutmeg
Grease a 9x13 baking dish and spread some of the apple pie filling on the bottom. Layer four lasagna noodles over the apple pie filling.
Mx together the Ricotta with the eggs, the almond extract and (white) sugar. When well-combined, spread evenly over the lasagna layer. Top with four more sheets of lasagna noodles and spread the remaining apple pie filling on top.
In another bowl, crumble together the flour, cinnamon, butter, brown sugar, oats and nutmeg. Sprinkle over the top layer of apple pie filling.
Bake in a preheated 350 oven for 45 minutes. Let stand for 15 minutes before slicing.
Top with sweetened sour cream or vanilla ice cream.
Friday, October 4, 2013
Wax-covered Chianti Bottles
...and red-checkered tablecloths.
Do those two things bring anything to mind?
Those are the images of Italian restaurants starting from the 1950s and going at least until the late 70s. How times and menus have changed in America's ristorante Italiani.

That being said, I went back in time with this week's dish and made the good old standard, "Eggplant Parmesan."
This dish requires four separate stages or processes, which is a bit unusual for any of my recipes, for as you know, I favor simplicity in pursuit of accessibility.
Nevertheless, it's important to liberally salt the eggplant slices in order to leech out the bitter liquid, as it is equally important to rinse off the salt and dry the slices. Then the slices must be dredged and fried. You have to make a sauce (well, you could actually use something from a jar, but why would you?); and then you have to bake a casserole.
But if you follow the steps, you'll end up with a succulent dish that gets even better as a leftover. Here's the video, followed by the recipe:
2 large eggplants
kosher salt
1 28 oz. can whole peeled tomatoes
1 large garlic clove, minced
1 1/2 cups olive oil for sauce and frying
1/2 cup all-purpose flour
1/2 cup fine dry bread crumbs
6 large eggs, beaten
1 1/2 lbs. Mozzarella cheese sliced into 1/4-inch rounds
1 cup grated Parmesan cheese
1 cup basil leaves, packed tightly
Cut eggplants lengthwise into 1/4-inch thick slices. Arrange one layer in the bottom of a large colander and sprinkle evenly and generously with salt. Repeat with remaining eggplant slices. Let drain for 2 hours.
While eggplant is draining, prepare the tomato sauce by combining the tomatoes, garlic and 1/3 cup of olive oil in a food processor. Season with salt and pepper and set aside.
When the eggplant has drained, press down on it to remove any excess liquid, then rinse with cold water and pat dry. Lay the slices out to dry further on paper towels.
Set up a three station dredge with flour in the first, beaten eggs in the second and breadcrumbs in the third.
Heat the rest of the oil in a deep skillet and fry the dredged eggplant slices until golden brown on each side. Drain again on paper towels.
Preheat the oven to 350. In the bottom of a glass casserole dish spread a cup of the tomato sauce. Top with one third of the eggplant slices. Top the eggplant with half the Mozzarella slices. Top with a third of the Parmesan cheese and half of the basil.
Repeat wit another layer of eggplant, cheeses and basil. Top with remaining tomato sauce and Parmesan cheese.
Bake for about 40 to 45 minutes until cheese is bubbly and just beginning to brown.
Friday, September 27, 2013
Kitchen Guy: Smoke Signals
Kitchen Guy: Smoke Signals: I'm used to smoking meats over long periods of time on my grill, using time-honored barbecue and smoking techniques. But I never smoked ...
Thursday, September 26, 2013
Smoke Signals
I'm used to smoking meats over long periods of time on my grill, using time-honored barbecue and smoking techniques. But I never smoked a vegetable (well, technically a fruit).

Then I came across a recipe for Smoked Tomato Soup that intrigued me. Actually, I was intrigued for two reasons. First - the recipe really sounded good. It was a great new wrinkle on the standard tomato soup. Second, I owned a stove top smoker that I had yet to use. It had been sitting on my equipment shelf for well over a year, primarily the result of a failed attempt at online retailing.
This recipe also gave me the opportunity to use my new Vita-Mix blender to its full potential. So gadget-happy me was -- well -- happy,
In studying the recipe, I was somewhat leery of the direction that only two of the 10 Roma tomatoes made it into the smoker. But that's why I prepare every recipe in advance before we begin our taping sessions. I've gone into some taping sessions cold and held up the production process because of unforeseen problems that crept up because I was not as familiar with a recipe as I should have been.
So my sous chef Josh and I made the recipe exactly as written and we were each blown away by the overall flavor and texture of the soup and we were equally amazed at the amount of smoky flavor that had been imparted by just two Romas, seeded and cut in half.

There was another aspect of this recipe that I enjoyed, as well, and that was that in its final form (served chilled) it resembled a smooth gazpacho. I know that it would be equally refreshing on a hot summer's night. It tasted pretty darned good heated, too, and I loved the versatility that presented.
Let me take a moment here to tell you about my experience with stovetop smoking. I got this smoker more than a year ago, as I mentioned above. It came with an assortment of wood chips (really, they're more like shavings) -- the usual flavors: hickory, oak, apple, and cherry.
So I soaked about a half cup of the hickory, put it in the bottom of the smoker, put the rack on top, then the four tomato halves. The top just slides on and makes a fairly tight seal. As a precaution, we turned on the exhaust system because I wanted to avoid setting off the smoke alarm. Surprising, no smoke leaked from the smoker until I slid open the top.
What I found was another way to peel tomatoes! The skin had begun to shrivel and just slid right off, leaving the smoke-infused pulp. Then you just add them to the other eight tomatoes that had been cooked with a few other flavorful ingredients (see the recipe below).
Now just one more thing about this smoker - and this could be worth your while to read this paragraph. Despite my failed attempt at becoming a culinary products e-tailer, I maintained a relationship with the sales manager at the company that makes these stovetop smokers. They've got quite an extensive line of other culinary products, but this is the one I want to call to your attention. My friends at Cameron's Products were appreciative of my featuring their product on my television show. So as a gesture to my subscribers and blog followers, you can buy a stovetop smoker and get 10% off the price, plus free shipping if you use the discount code: KITCHENGUY. Go to the Cameron's Products website and check it out. This offer expires Oct. 15, 2013.
Here's the video, followed by the recipe:
1/4 cup Hickory wood chips
10 large Roma tomatoes, halved and seeded
1/4 cup extra virgin olive oil
1 large onion, finely diced
1 large leek, halved lengthwise and thinly sliced
1 1/2 tsp coriander seeds
2 large garlic cloves, smashed
2 bay leaves
1 tsp finely grated horseradish
1 cup chicken stock (or vegetable stock)
1 pinch sugar
4 Tbsp unsalted butter
salt and pepper to taste
fresh basil for garnish
Scatter wood chips in a cast iron skillet and cover tightly. Heat chips over moderately high heat until smoking. (Alternatively, use a stovetop smoker, as shown in the video. If you would like to purchase the stovetop smoker as seen in this video, you will receive a 10% discount and free shipping if you order before Oct. 15, 2013. Go to the Cameron's Products website to order.
Halve and seed 2 tomatoes and roughly chop the remaining tomatoes. Place 4 tomato halves on a rack and set the rack in the cast iron skillet or stove top smoker. Cover and smoke the tomatoes for at least 3 minutes or until just softened. Transfer the smoked tomatoes to a plate, reserve to cool, then peel off the skin.
Heat olive oil in a large saucepan until shimmering, Add onion and leek to pan and cook over moderate heat, stirring frequently until softened but not browned, about 10 minutes. Add coriander seeds, garlic, bay leaves and horseradish and cook until fragrant, about 2 more minutes.
Add chopped tomatoes, including smoked tomatoes, along with chicken (or vegetable) stock and sugar to pan. Cover and cook over moderate heat until tomatoes are softened, about 10 minutes. Discard the bay leaves.
Remove to a blender to puree. Transfer to a clean pot to heat. Season with salt and pepper and garnish with basil.
This soup is also excellent when served chilled like a gazpacho.
Friday, September 20, 2013
Inside the Box - Part Deux
Sometimes people send me nasty emails. I got one this week after I sent the weekly newsletter with the recipe and video for "Seafood Au Gratin." This particular recipe, which I copied word-for-word and step-by-step from the inside of the Pepperidge Farms Puff Pastry box (mentioned in the video), called for garlic powder and chopped parsley to be added to the bechamel.
So the email was very curt: "You're a chef. You should know you never use garlic powder and you never cook parsley."
Really?
Well, truth be told, I wasn't really cooking either one. I added each as a flavoring agent. And then I used more parsley as garnish to add a little color to the dish.
Anyway, each is entitled to his or her opinion. I liken this to my recipe for Tiramisu, the delicious Italian dessert that uses ladyfingers dipped in espresso with mascarpone and cream. I've often said that this is but one version. And there are probably tens of thousands more that have slight variations. In fact what I said was that there was probably a tiramisu recipe for every grandma in Italy.
Nevertheless, my recipe this week is not an original. It is, as noted above, from the inside of the puff pastry box. And the reason I called this week's blog "Part Deux" is because a few weeks ago I used another recipe from inside the same box -- for White Chocolate Mousse.
So I don't have very much else to say about this recipe because it speaks for itself. The technique for making the sauce is fairly classic: A roux, consisting of equal parts of unsalted butter and all-purpose flour, then some milk that is stirred until it's hot enough that the roux thickens it. Then further thickening with the addition of shredded cheese.
Actually, there is one other note on this. A colleague who is a personal chef asked if this dish could be frozen. The answer is a resounding "No." Roux-based cheese sauces do not freeze well. They become grainy as the ice crystals work their way into the sauce. And puff pastry couldn't stand up to the humidity that is part of every freezer.
So here's the video, followed by the recipe. And don't worry about the garlic powder and parsley. I give you my permission to cook with both.
10 puff pastry shells
4 Tbsp unsalted butter
1/2 lb shrimp, peeled and deveined
1/2 lb scallops, cut into bite-sized pieces
2 cups cremini mushrooms, sliced
1/4 tsp garlic powder
2 Tbsp flour
1 1/2 cups whole milk
1 cup shredded Swiss cheese
2 Tbsp fresh parsley, chopped
Bake pastry shells according to package directions.
In a skillet over medium heat, melt half of the butter. Add the shrimp and scallops and cook until done -- about 3 minutes. Season with salt and pepper and set aside.
Add mushrooms and garlic powder to the pan and cook over medium heat until tender. Set mushroom mixture aside.
In another pan, add the remaining butter and stir in flour until smooth. Add milk and cook until the mixture comes to a boil. Reduce to a simmer until the mixture thickens. Add the cheese and the parsley and cook over low heat until the cheese is completely melted and incorporated into the sauce.
Return seafood and mushrooms to the pan you cooked them in and heat through.
Divide among the puff pastry shells and pour the sauce over. Garnish with additional parsley.
Subscribe to:
Posts (Atom)