
About eight years ago I took on a project for a new business in Missoula. The concept was interesting -- one that incorporated all kinds of beverages (except hard liquor). The specialties of the house were coffee drinks, teas, and chai. But there were a bazillion places to get that stuff so the business needed something to set it apart from the other coffee spots.
Hence, my project. I set about creating a menu of 12 meal-sized crepes, six sweet and six savory. I also created an extra number -- the store's signature crepe -- and I called it "A Study in Chocolate." It incorporated chocolate in six different forms -- a chocolate crepe, filled with chocolate custard with a sprinkling of chocolate chips, dusted with cocoa powder, drizzled with chocolate syrup, and topped with chocolate whipped cream. It was a huge hit.
But an even bigger hit came about when November rolled around and I created a seasonal special I called "Turkey in the Straw." I took an unsweetened crepe, spread cream cheese on it (instead of mayo), topped that with cranberry relish, then some replicated stuffing, bite-sized cubes of turkey and french fried onions (the kind you might see on a green bean casserole).
When the business's crepe-maker broke down (it was a super expensive model imported from Switzerland), instead of replacing it or having it repaired, the place decided to go out of the crepe business and concentrate on its various lines of beverages.
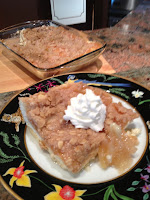
That saddened me. So I reclaimed my crepe recipes and re-purposed "Turkey in the Straw." This time, however, I used the same ingredients but instead of in a crepe, I decided to use a 10-inch flour tortilla. I rolled it up, burrito style, cut it in half on the diagonal and -- just like the crepe version from eight years ago, I couldn't make them fast enough.
So if you're looking for a way to dress up the leftovers from Thanksgiving, try my Turkey in the Straw burrito. A little salsa on the side probably wouldn't hurt.
Saturday, November 30, 2013
Thursday, November 14, 2013
The Kitchen Guy Holiday Rescue Menu
America's favorite eating holiday is almost upon us and that day - Thanksgiving Day - also signals the beginning of the big eating season. Holiday dinners, family dinners, business dinners, dinner dinners. That can be a lot of pressure if you're the one tasked with doing the cooking.
Enter (or shall I say re-enter?) the Kitchen Guy Holiday Rescue Menu.

I've put together a collection of side dishes and desserts, all designed to lighten your burden, starting on Thanksgiving Day right up through New Year's.
For sides, I've got Marbled Mashed Potatoes, a creamy blend of mashed Russets and mashed yams,
enriched with cream cheese and swirled together -- hence the name "marbled." My Brussels Sprout "Hash" has been very popular in years past and so it makes a return to the list of sides available for ordering. Perhaps the most requested, though, is my signature Cranberry Relish, made with caramelized red onions, balsamic syrup and a hint of brown sugar. You'll never miss the tin can indentations at your holiday table.
 Desserts are the star in the Holiday Rescue Menu, as that's the lasting impression of almost every meal. So for all of my hungry friends around the state of Montana, I'll be baking Cranberry Upside Down Cake, Lemon Tart, Pumpkin-Ginger Tart, Chocolate Swirl Cheesecake, and Gluten-Free Dark Chocolate Torte with Chocolate Honey Glaze. There are other selections, too, but I wanted to highlight some of the more popular ones.
The Holiday Rescue Menu was absent last year as I had major surgery just before the holidays. But I'm all healed and rarin' to go to help you make the holidays memorable.
On Thanksgiving this year, there will be a once-in-a-lifetime concurrence of Chanukah -- so we're calling Thanksgivnukah and offering a variety of latke (potato pancake) preparations, including my award winning Latke Napoleon, regular latkes and a latke made from a mixture of Russets, Sweet Potatoes and Parsnips.
New this time around is a delivery schedule before Thanksgiving and before Christmas in all of Montana's major cities. We'll set up dates and times in Kalispell, Great Falls, Helena, Butte, Bozeman and Billings. There is a modest extra charge to cover the cost of delivery to cities outside of Missoula.
Check out all of the Holiday Rescue Menu offerings at my special online store. Click on this link: http://shop.kitchenguy.biz for the whole menu. And if you're one of the first 10 people to order, you'll receive a Kitchen Guy tote bag with your order.
Ready. Set. Order!
Enter (or shall I say re-enter?) the Kitchen Guy Holiday Rescue Menu.

I've put together a collection of side dishes and desserts, all designed to lighten your burden, starting on Thanksgiving Day right up through New Year's.
For sides, I've got Marbled Mashed Potatoes, a creamy blend of mashed Russets and mashed yams,
enriched with cream cheese and swirled together -- hence the name "marbled." My Brussels Sprout "Hash" has been very popular in years past and so it makes a return to the list of sides available for ordering. Perhaps the most requested, though, is my signature Cranberry Relish, made with caramelized red onions, balsamic syrup and a hint of brown sugar. You'll never miss the tin can indentations at your holiday table.
The Holiday Rescue Menu was absent last year as I had major surgery just before the holidays. But I'm all healed and rarin' to go to help you make the holidays memorable.
On Thanksgiving this year, there will be a once-in-a-lifetime concurrence of Chanukah -- so we're calling Thanksgivnukah and offering a variety of latke (potato pancake) preparations, including my award winning Latke Napoleon, regular latkes and a latke made from a mixture of Russets, Sweet Potatoes and Parsnips.
New this time around is a delivery schedule before Thanksgiving and before Christmas in all of Montana's major cities. We'll set up dates and times in Kalispell, Great Falls, Helena, Butte, Bozeman and Billings. There is a modest extra charge to cover the cost of delivery to cities outside of Missoula.
Check out all of the Holiday Rescue Menu offerings at my special online store. Click on this link: http://shop.kitchenguy.biz for the whole menu. And if you're one of the first 10 people to order, you'll receive a Kitchen Guy tote bag with your order.
Ready. Set. Order!
Thursday, November 7, 2013
Italian-Asian Fusion
Seriously? Italian and Asian? Well, sort of. If you count the egg roll wrappers sold in the produce section of your supermarket as an Asian ingredient, then yes.
But technically, it's pasta. Shall we recount the Marco Polo legend about bringing pasta from China to Italy? Nah - this is a cooking blog.
Anyway, I did this recipe once before on TV and called it "Italian Chicken Bundles." With all of the changes in television technology, I needed a high definition version of the dish and in the process renamed the bundles "purses."
Perhaps I should have led with this: This recipe is one of my all-time favorites. When I was in the personal chef business, my clients loved this dish. It's designed to be an appetizer or first course, but most of the people who've tried my recipe report back that they made a dinner out of them.
Here's a picture of what it looks like. I think you'll see that, based on appearances alone, it's a beautiful dish. Tasting the filling will confirm it.
Your muffin tin is the perfect vessel to make the "purses." While the egg roll wrappers may seem to be sturdy pieces of pasta, they actually tear quite easily, so it's important to be gentle while pushing the wrapper into the muffin cup. Try to center it so that when you go to close it, the ends of the wrapper come together uniformly. It will make for a good looking bundle or purse after it finishes baking.
The ingredients in the filling are fairly mild, especially with the ricotta cheese and chicken. So I jazzed up the dish by placing the purse in a pool of spicy marinara. If spicy isn't your thing, then a regular tomato sauce or pasta sauce will do.
Here's the video followed by the recipe:
1 1/2 cups chicken breasts, cooked and cubed (bite sized)
3 large green onions, sliced thin
1 tablespoon olive oil
1 medium to large garlic clove, minced
2/3 cup gated Parmesan cheese
2 spinach bunches, washed, stemmed, steamed and minced
8 ounces Ricotta cheese
1/4 teaspoon dried oregano
1/4 teaspoon freshly grated nutmeg
salt and pepper, to taste
2 tablespoons butter
12 egg roll wrappers
Marinara sauce for serving
Preheat the oven to 350.
Cook chicken and green onions in the oil over medium-high heat until chicken is lightly browned and onions are soft. Add garlic and cook one minute longer.Let cool slightly then combine 1/2 of the Parmesan with the spinach, ricotta, oregano and nutmeg. Season with salt and pepper.
In a 12-cup muffin tin, brush melted butter into 10 of the 12 muffin cups, reserving half of the melted butter for later. Carefully press one egg roll wrapper into a muffin cup and fill with the chicken mixture. Close egg roll wrapper over filling by gathering the ends and gently twisting. Brush with some of the remaining melted butter.
Continue until all 10 muffin tins are filled.
Bake for about 20 to 25 minutes, or until lightly browned on top.
Serve in a pool of marinara sauce and garnish with additional Parmesan cheese and Italian parsley sprigs.
Sunday, November 3, 2013
Is there a problem with this omelet?
When I pick recipes to present on my television show, a lot of thought goes into the process. Maybe I should run it by some other people, based on the response to this week's recipe.
I thought that an omelet with bacon and avocado (repeat: BACON!!!!) would gain some notice. But looking at the counts on the various places where these episodes are posted, including the newsletter I send out every week, it is the least viewed episode EVER.
Hmmmm. What could be wrong? Could it be that everyone knows how to make an omelet. Could it be they've heard of this combination before. Could it be that they hate hate hate this combination?
I'm stumped. So I'm going to show it again in this blog and maybe some of you will enlighten me as to why it is -- far and away -- the least viewed episode in the 10+ year history of Kitchen Guy.
Here's the video, followed by the recipe:
For each omelet:
1 Tbsp unsalted butter
3 large eggs
2 oz bacon, crumbled
2 Tbsp Monterey Jack cheese, shredded
2 ripe avocado slices
1 Tbsp sour cream
2 Tbsp salsa
salt and pepper to taste
Crumble a slice of bacon. Heat butter in an omelet pan.
Whisk the eggs, adding salt and pepper, and cook until mostly set, but still creamy on top.
Evenly spread crumbled bacon and sliced avocado over half the omelet.
Fold the omelet and heat through, turning if desired.
Melt the cheese on top.
Garnish with sour cream and salsa and additional avocado slices.
Monday, October 21, 2013
The NEW Kitchen Guy Recipe Archive
I am pleased to announce the launch of the redesigned Kitchen Guy Recipe Archive, a compendium of all of the recipes I have cooked on my television show for the past 10+ years.
You will find the Archive easier to navigate in addition to having a search utility that allows you to enter an ingredient or a recipe title.
Another new feature is a print and PDF converter.
Thanks to my tech guy, Damon C., for carrying the lion's share of the load. All I did was retype and make corrections.
To access the new archive, go to http://kitchenguyarchive.com.
Friday, October 18, 2013
Oops. I Did It Again.
With apologies to Ms. Spears, I'm referring to another recipe I did involving Brussels sprouts because the hatred for them is legendary.
That's generally because your mother cooked them until they were dead and gray.
This week, I decided to deep fry the leaves, a process that requires a bit of precision work. First you must chop off the stem and remove the discolored outer leaves. The best Brussels sprouts have inner leaves that cling tightly to the layer of leaves beneath them, so you've got to exercise a bit of care to loosen the leaf enough to peel it off and have a whole specimen to plunge into hot oil.
As you'll hear in the video, I suggest that you keep the inner parts of the sprouts you've peeled to make another of my "turn the Brussels sprout hater into a Brussels sprout lover" dish. I was referring to the one that aired a few weeks ago that I call "Brussels Sprout Hash."
And now I can add a disclaimer or an admission of error in calling that dish "Hash." It has no potatoes. It does have bacon. But no potatoes. So it's technically not a hash. Does anyone, except the Culinary Institute of America really care?
The dipping sauce for this week's dish is quite spicy and if I could change one thing, I might add some extra honey to thicken it a bit more so it could cling to the leaves that turn into "chips" once they've been deep fried.
There's also a caution for you in my dialogue and that regards the high water content of the leaves and what happens when you drop them into a pot of oil that's at 350 degrees. They splatter and that hurts when it splatters on you. So you can use a pot lid as a shield of sorts until the splattering settles down.
I bought one of those home deep fryers a while ago and it actually allows you to close a lid at the same time you lower the fry basket into the oil. That certainly would take care of the splattering.
So here's the video followed by the recipe. And I promise: no more Brussels sprout recipes for at least a year.
1/2 lb Brussels sprouts
3 tsp honey
1 tsp Sriracha sauce
1/2 tsp Thai sweet chili paste
2 tsp lemon juice
1/4 tsp sesame oil
1 tsp sesame seeds
canola oil for frying
Trim off the bottoms of the sprouts and discard the outermost discolored leaves. Pull off and set aside the next two layers of leaves, reserving the hearts for another use.
Make the sauce: whisk together honey, Sriracha, chili paste, lemon juice, sesame oil and sesame seeds in a small bowl and set aside.
Meanwhile, pour about 2 inches of oil in a pot and heat to 350º. Fry the sprouts in three batches, using the lid of the pot to protect your hands and face from popping oil. Cook for about 30 seconds or until the leaves are brown and risk. Drian on paper towels and sprinkle with flaky sea salt.
Once all of the batches are fried, transfer the chips to a bowl and drizzle some of the sauce over them. Toss lightly to coat and add more sauce if needed. Or pass the chips and let every one dip their own.
Saturday, October 12, 2013
Apple Lasagna - Am I Kidding?
No. It's for real. A lasagna for dessert.
Pasta sheets are made from dough, aren't they? Of course they are. Pie crust is made from dough. Isn't it? Yep.
So what's all the fuss?
 There are some purists out there who took me to task for messing with the Italian classic. But this isn't the first time I've messed around with classic lasagna. A number of years ago when I first started doing the weekly Kitchen Guy program, I made a crab meat lasagna -- probably one of the most expensive dishes I've ever made on the program. Do you know how much crab meat you have to use to fill a 9x13 baking dish?
Anyway, I decided to give this a whirl and treat the apple lasagna as if it were a hybrid between a pie and a crumble, hence the topping made from quick-cooking oats, butter and brown sugar. I could have added nuts and raisins -- hey -- that's a great idea! Next time I make it, I'm going to add nuts and raisins.
Seriously, if you want to surprise the family or dinner guests with an unusual dessert, this will do it. It has all of the elements of a lasagna, with the apple pie filling (I used the canned stuff found in the baking aisle of the supermarket, but you can certainly make your own), as a substitute for the meat and sauce; the lasagna sheets, of course, and the cheese filling.
In my traditional lasagna, I use a combination of cheeses, but I chose to use only ricotta. I suppose I could have used mascarpone, as it is already sweetened. But ricotta seemed the logical choice to keep up the lasagna-like appearance of the dessert.
So while you'll never find this dessert in any self-respecting Italian restaurant, it's perfectly acceptable to serve it in our homes. don't you agree? After all, we want to eat stuff that tastes good. And this dessert really tastes good. Here's the video, followed by the recipe.
8 lasagna noodles (uncooked)
2 20-oz. cans apple pie filling
1 32-oz. container Ricotta cheese
2 large eggs, beaten
1 tsp almond extract
1/4 cup sugar
6 Tbsp flour
1/2 tsp ground cinnamon
3 Tbsp unsalted butter
6 Tbsp brown sugar
1/4 cup quick-cooking oats
freshly grated nutmeg
Grease a 9x13 baking dish and spread some of the apple pie filling on the bottom. Layer four lasagna noodles over the apple pie filling.
Mx together the Ricotta with the eggs, the almond extract and (white) sugar. When well-combined, spread evenly over the lasagna layer. Top with four more sheets of lasagna noodles and spread the remaining apple pie filling on top.
In another bowl, crumble together the flour, cinnamon, butter, brown sugar, oats and nutmeg. Sprinkle over the top layer of apple pie filling.
Bake in a preheated 350 oven for 45 minutes. Let stand for 15 minutes before slicing.
Top with sweetened sour cream or vanilla ice cream.
Friday, October 4, 2013
Wax-covered Chianti Bottles
...and red-checkered tablecloths.
Do those two things bring anything to mind?
Those are the images of Italian restaurants starting from the 1950s and going at least until the late 70s. How times and menus have changed in America's ristorante Italiani.

That being said, I went back in time with this week's dish and made the good old standard, "Eggplant Parmesan."
This dish requires four separate stages or processes, which is a bit unusual for any of my recipes, for as you know, I favor simplicity in pursuit of accessibility.
Nevertheless, it's important to liberally salt the eggplant slices in order to leech out the bitter liquid, as it is equally important to rinse off the salt and dry the slices. Then the slices must be dredged and fried. You have to make a sauce (well, you could actually use something from a jar, but why would you?); and then you have to bake a casserole.
But if you follow the steps, you'll end up with a succulent dish that gets even better as a leftover. Here's the video, followed by the recipe:
2 large eggplants
kosher salt
1 28 oz. can whole peeled tomatoes
1 large garlic clove, minced
1 1/2 cups olive oil for sauce and frying
1/2 cup all-purpose flour
1/2 cup fine dry bread crumbs
6 large eggs, beaten
1 1/2 lbs. Mozzarella cheese sliced into 1/4-inch rounds
1 cup grated Parmesan cheese
1 cup basil leaves, packed tightly
Cut eggplants lengthwise into 1/4-inch thick slices. Arrange one layer in the bottom of a large colander and sprinkle evenly and generously with salt. Repeat with remaining eggplant slices. Let drain for 2 hours.
While eggplant is draining, prepare the tomato sauce by combining the tomatoes, garlic and 1/3 cup of olive oil in a food processor. Season with salt and pepper and set aside.
When the eggplant has drained, press down on it to remove any excess liquid, then rinse with cold water and pat dry. Lay the slices out to dry further on paper towels.
Set up a three station dredge with flour in the first, beaten eggs in the second and breadcrumbs in the third.
Heat the rest of the oil in a deep skillet and fry the dredged eggplant slices until golden brown on each side. Drain again on paper towels.
Preheat the oven to 350. In the bottom of a glass casserole dish spread a cup of the tomato sauce. Top with one third of the eggplant slices. Top the eggplant with half the Mozzarella slices. Top with a third of the Parmesan cheese and half of the basil.
Repeat wit another layer of eggplant, cheeses and basil. Top with remaining tomato sauce and Parmesan cheese.
Bake for about 40 to 45 minutes until cheese is bubbly and just beginning to brown.
Friday, September 27, 2013
Kitchen Guy: Smoke Signals
Kitchen Guy: Smoke Signals: I'm used to smoking meats over long periods of time on my grill, using time-honored barbecue and smoking techniques. But I never smoked ...
Thursday, September 26, 2013
Smoke Signals
I'm used to smoking meats over long periods of time on my grill, using time-honored barbecue and smoking techniques. But I never smoked a vegetable (well, technically a fruit).

Then I came across a recipe for Smoked Tomato Soup that intrigued me. Actually, I was intrigued for two reasons. First - the recipe really sounded good. It was a great new wrinkle on the standard tomato soup. Second, I owned a stove top smoker that I had yet to use. It had been sitting on my equipment shelf for well over a year, primarily the result of a failed attempt at online retailing.
This recipe also gave me the opportunity to use my new Vita-Mix blender to its full potential. So gadget-happy me was -- well -- happy,
In studying the recipe, I was somewhat leery of the direction that only two of the 10 Roma tomatoes made it into the smoker. But that's why I prepare every recipe in advance before we begin our taping sessions. I've gone into some taping sessions cold and held up the production process because of unforeseen problems that crept up because I was not as familiar with a recipe as I should have been.
So my sous chef Josh and I made the recipe exactly as written and we were each blown away by the overall flavor and texture of the soup and we were equally amazed at the amount of smoky flavor that had been imparted by just two Romas, seeded and cut in half.

There was another aspect of this recipe that I enjoyed, as well, and that was that in its final form (served chilled) it resembled a smooth gazpacho. I know that it would be equally refreshing on a hot summer's night. It tasted pretty darned good heated, too, and I loved the versatility that presented.
Let me take a moment here to tell you about my experience with stovetop smoking. I got this smoker more than a year ago, as I mentioned above. It came with an assortment of wood chips (really, they're more like shavings) -- the usual flavors: hickory, oak, apple, and cherry.
So I soaked about a half cup of the hickory, put it in the bottom of the smoker, put the rack on top, then the four tomato halves. The top just slides on and makes a fairly tight seal. As a precaution, we turned on the exhaust system because I wanted to avoid setting off the smoke alarm. Surprising, no smoke leaked from the smoker until I slid open the top.
What I found was another way to peel tomatoes! The skin had begun to shrivel and just slid right off, leaving the smoke-infused pulp. Then you just add them to the other eight tomatoes that had been cooked with a few other flavorful ingredients (see the recipe below).
Now just one more thing about this smoker - and this could be worth your while to read this paragraph. Despite my failed attempt at becoming a culinary products e-tailer, I maintained a relationship with the sales manager at the company that makes these stovetop smokers. They've got quite an extensive line of other culinary products, but this is the one I want to call to your attention. My friends at Cameron's Products were appreciative of my featuring their product on my television show. So as a gesture to my subscribers and blog followers, you can buy a stovetop smoker and get 10% off the price, plus free shipping if you use the discount code: KITCHENGUY. Go to the Cameron's Products website and check it out. This offer expires Oct. 15, 2013.
Here's the video, followed by the recipe:
1/4 cup Hickory wood chips
10 large Roma tomatoes, halved and seeded
1/4 cup extra virgin olive oil
1 large onion, finely diced
1 large leek, halved lengthwise and thinly sliced
1 1/2 tsp coriander seeds
2 large garlic cloves, smashed
2 bay leaves
1 tsp finely grated horseradish
1 cup chicken stock (or vegetable stock)
1 pinch sugar
4 Tbsp unsalted butter
salt and pepper to taste
fresh basil for garnish
Scatter wood chips in a cast iron skillet and cover tightly. Heat chips over moderately high heat until smoking. (Alternatively, use a stovetop smoker, as shown in the video. If you would like to purchase the stovetop smoker as seen in this video, you will receive a 10% discount and free shipping if you order before Oct. 15, 2013. Go to the Cameron's Products website to order.
Halve and seed 2 tomatoes and roughly chop the remaining tomatoes. Place 4 tomato halves on a rack and set the rack in the cast iron skillet or stove top smoker. Cover and smoke the tomatoes for at least 3 minutes or until just softened. Transfer the smoked tomatoes to a plate, reserve to cool, then peel off the skin.
Heat olive oil in a large saucepan until shimmering, Add onion and leek to pan and cook over moderate heat, stirring frequently until softened but not browned, about 10 minutes. Add coriander seeds, garlic, bay leaves and horseradish and cook until fragrant, about 2 more minutes.
Add chopped tomatoes, including smoked tomatoes, along with chicken (or vegetable) stock and sugar to pan. Cover and cook over moderate heat until tomatoes are softened, about 10 minutes. Discard the bay leaves.
Remove to a blender to puree. Transfer to a clean pot to heat. Season with salt and pepper and garnish with basil.
This soup is also excellent when served chilled like a gazpacho.
Friday, September 20, 2013
Inside the Box - Part Deux
Sometimes people send me nasty emails. I got one this week after I sent the weekly newsletter with the recipe and video for "Seafood Au Gratin." This particular recipe, which I copied word-for-word and step-by-step from the inside of the Pepperidge Farms Puff Pastry box (mentioned in the video), called for garlic powder and chopped parsley to be added to the bechamel.
So the email was very curt: "You're a chef. You should know you never use garlic powder and you never cook parsley."
Really?
Well, truth be told, I wasn't really cooking either one. I added each as a flavoring agent. And then I used more parsley as garnish to add a little color to the dish.
Anyway, each is entitled to his or her opinion. I liken this to my recipe for Tiramisu, the delicious Italian dessert that uses ladyfingers dipped in espresso with mascarpone and cream. I've often said that this is but one version. And there are probably tens of thousands more that have slight variations. In fact what I said was that there was probably a tiramisu recipe for every grandma in Italy.
Nevertheless, my recipe this week is not an original. It is, as noted above, from the inside of the puff pastry box. And the reason I called this week's blog "Part Deux" is because a few weeks ago I used another recipe from inside the same box -- for White Chocolate Mousse.
So I don't have very much else to say about this recipe because it speaks for itself. The technique for making the sauce is fairly classic: A roux, consisting of equal parts of unsalted butter and all-purpose flour, then some milk that is stirred until it's hot enough that the roux thickens it. Then further thickening with the addition of shredded cheese.
Actually, there is one other note on this. A colleague who is a personal chef asked if this dish could be frozen. The answer is a resounding "No." Roux-based cheese sauces do not freeze well. They become grainy as the ice crystals work their way into the sauce. And puff pastry couldn't stand up to the humidity that is part of every freezer.
So here's the video, followed by the recipe. And don't worry about the garlic powder and parsley. I give you my permission to cook with both.
10 puff pastry shells
4 Tbsp unsalted butter
1/2 lb shrimp, peeled and deveined
1/2 lb scallops, cut into bite-sized pieces
2 cups cremini mushrooms, sliced
1/4 tsp garlic powder
2 Tbsp flour
1 1/2 cups whole milk
1 cup shredded Swiss cheese
2 Tbsp fresh parsley, chopped
Bake pastry shells according to package directions.
In a skillet over medium heat, melt half of the butter. Add the shrimp and scallops and cook until done -- about 3 minutes. Season with salt and pepper and set aside.
Add mushrooms and garlic powder to the pan and cook over medium heat until tender. Set mushroom mixture aside.
In another pan, add the remaining butter and stir in flour until smooth. Add milk and cook until the mixture comes to a boil. Reduce to a simmer until the mixture thickens. Add the cheese and the parsley and cook over low heat until the cheese is completely melted and incorporated into the sauce.
Return seafood and mushrooms to the pan you cooked them in and heat through.
Divide among the puff pastry shells and pour the sauce over. Garnish with additional parsley.
Sunday, September 15, 2013
The Ins and Outs of Trout
My editor at Distinctly Montana thought it would be a good idea if I wrote something about preparing one of the native fish species abundant in the state. I agreed. But I'm not a fisherman and the folks I know who do fish are catch-and-release fly fishing enthusiasts.
So I had no one that I could dispatch to catch me some legal trout.
One of the difficulties one runs into in a sparsely populated state like Montana -- especially if you don't fish -- is that it's difficult to find a place that sells fresh fish. You can get almost anything you want frozen. But I really wanted to find some fresh trout because I had (read that have) a killer recipe that I know you're going to love.
What you may not love is the filleting part. I will tell you now that it takes time and great care. And you also need a boning knife with a flexible blade that's razor sharp. More on that in a bit.
To my great surprise, I found fresh trout at my neighborhood Costco -- gutted, thank you very much -- and packed four to a tray. And they were cheap, too. I paid less than $11 for the four and they weighed just about a pound each.
I confess that I have never filleted small fish, but I have experience removing the bones of larger species of fish -- salmon to name one. Trout are delicate and their bone structure is quite fragile and very closely attached to the meat of the fish.
I consulted two of the texts I have from culinary school and saw a wonderful illustration on removing the skeleton of a fish in several steps. And since I had four trout and only needed to cook two, I had "practice fish" to massacre -- I mean perfect my technique.


In the top photo, I've begun my filleting at the tail and carefully guided my knife along the rib bones, separating the flesh. You have to do this is small cuts because the bones are so delicate and firmly implanted into the flesh. In the bottom photo, you can see that I've progressed toward the neck (did I mention that you need to cut off the head right behind the gills? No? You have to do that before you start the filleting process).

As you can see in the above photo, after the filleting process is completed and the fish has essentially been "butterflied," lay them skin side down on a rimmed baking sheet lightly coated with cooking spray. Then brush melted butter over the flesh of each filet, followed by salt and pepper.

I then preheated my broiler and moved the top rack of the oven to about three inches from the heating elements. After salting and peppering each filet, I spread the herb and spice mixture liberally over each and placed the pan under the broiler.
Pay attention! These cook fast. It only took about two and a half minutes. For good measure, I turned the pan around for an additional 30 seconds under the broiler and then removed the pan from the oven.

And here they are on my very special artsy fish platter, ready to serve. The herb and spice mixture is a great contrast to the delicate flesh of this breed of trout. My dinner guests and I enjoyed the fish with a chilled Pinot Grigiot from King Estate, an Oregon producer that I've been a fan of for many many years.
Once again, here's the recipe for Herbed Butterflied Trout:
This recipe serves two. I doubled the quantities to make four filets.
Mix together a quarter-teaspoon each of celery seed, dried oregano,
paprika, sugar and dried thyme, along with a half teaspoon of garlic powder. Be
sure to add some kosher salt and freshly ground pepper to the mixture.
Place the butterflied fish filets on a rimmed baking sheet fully
opened. Spread a small amount of softened butter over the flesh of the fish or
brush with olive oil. Salt and pepper the filets and then pat in the herb and spice mixture.
Broil until golden and cooked through – it should take only two or
three minutes.
Wednesday, September 11, 2013
Relishing Zucchini
This is a story about the overflow of zucchini from our gardens this time of year. It's a two- maybe three-pronged story.
So first, at my wife's office, one of her employees brought her a cucumber from her garden that was so big, my wife thought it was a zucchini. The next day this same person brought in a zucchini from her garden that dwarfed the cucumber. Here's the picture of it with a measuring tape below.

3 small to medium red bell peppers, chopped
2 Tbsp salt
1 cup sugar
2 tsp celery seed
1 Tbsp turmeric
1 tsp mustard seed
1 cup apple cider vinegar
Combine all vegetables and sprinkle with the salt, then cover with cold water. Let stand for 2 hours. Drain and rinse well. Then drain again.
Combine the sugar, celery seed, turmeric, mustard seed and vinegar in a large saucepan. Bring the liquids and spices to a boil.
Add the vegetables and let simmer for about 10 minutes.
Pack the hot vegetable relish into sterile pint jars, leaving 1/4-inch head space. Make sure the jars are free of any food or canning residue on the tops of the jars. Tap the jars lightly on your counter to remove air bubbles.
Adjust sterilized two-piece lids on the jars and tighten.
Place the jars in a water bath in a canner or deep stock pot. Be sure the water covers the lids. Process for 20 minutes. Higher altitudes (above 3500 feet) should process for 30 minutes.
Remove the jars from the water and place on a towel to dry and cool. When you hear the lids "pop" your relish jars are vacuum sealed. Let cool for 12 to 24 hours and then label. Any jars that do not seal should be refrigerated and used within a week.
So first, at my wife's office, one of her employees brought her a cucumber from her garden that was so big, my wife thought it was a zucchini. The next day this same person brought in a zucchini from her garden that dwarfed the cucumber. Here's the picture of it with a measuring tape below.

As you can see - or maybe you can't -- but the tape measure is at 19 inches. the circumference of the vegetable was almost 20 inches.
I did make use of some of it. We entertained some VIPs from back East and I sliced the zucchini, then oiled both sides, salted and peppered the slices (minus the seeds, of course) and grilled them. I finished them in a low oven, just to soften the zuke. I then filled the center with a moose meat chili.
But I digress. This week's blog is supposed to be about normal size zucchini that you get from your garden. It's also about a friend from childhood that I reconnected with on Facebook seeing me bemoaning the fact that I had so much zucchini (last year) that she sent me a recipe for a darned good relish that I now process and can so that we enjoy it throughout the year.
This recipe also helps me with the surplus of bell peppers I have. With the addition of onions, some spices and apple cider vinegar, this turns out to be a very nice chunky relish that works with almost anything.
So thanks first to Jean Sautter for the monster zuke. And a very big thanks to my old friend from Pennsylvania, who now leads the vegan life in rural Oregon, Fay Stein, for this great relish recipe.
Here's the video, followed by the recipe:
Home-Canned Zucchini and Peppers
3 medium zucchini, cut into small cubes
1 large onion, chopped3 small to medium red bell peppers, chopped
2 Tbsp salt
1 cup sugar
2 tsp celery seed
1 Tbsp turmeric
1 tsp mustard seed
1 cup apple cider vinegar
Combine all vegetables and sprinkle with the salt, then cover with cold water. Let stand for 2 hours. Drain and rinse well. Then drain again.
Combine the sugar, celery seed, turmeric, mustard seed and vinegar in a large saucepan. Bring the liquids and spices to a boil.
Add the vegetables and let simmer for about 10 minutes.
Pack the hot vegetable relish into sterile pint jars, leaving 1/4-inch head space. Make sure the jars are free of any food or canning residue on the tops of the jars. Tap the jars lightly on your counter to remove air bubbles.
Adjust sterilized two-piece lids on the jars and tighten.
Place the jars in a water bath in a canner or deep stock pot. Be sure the water covers the lids. Process for 20 minutes. Higher altitudes (above 3500 feet) should process for 30 minutes.
Remove the jars from the water and place on a towel to dry and cool. When you hear the lids "pop" your relish jars are vacuum sealed. Let cool for 12 to 24 hours and then label. Any jars that do not seal should be refrigerated and used within a week.
Friday, September 6, 2013
One Tomato, Two Tomato
If you're old enough to remember -- there used to be a saying that "real men don't eat quiche." There also is an old saying, "50 million Frenchmen can't be wrong."
I like quiche. I've always liked quiche. What could be wrong with ham and cheese and onions baked in a tart shell? So that's why I chose to show you a variation on the classic quiche -- one that might help you use some of the bounty from your garden, as the growing season for most of us in the north winds up.
We've got lots of tomatoes in our garden, mostly Romas. The recipe calls for one can of diced tomatoes, but I add parenthetically that you can use fresh tomatoes. The quantity you need depends primarily on the variety of tomato you use. Since I use the Roma variety, I need about 4, sometimes 5 to make this recipe. If you're using the Beefsteak variety you may need only one or perhaps one and a half.
You can always weigh your tomato addition after you've seeded and diced them. The recipe calls for a 14-1/2 ounce can.
And truth be told, when all is baked, this quiche tastes almost like a deep dish pizza. If I had added oregano, it probably would have tasted almost exactly like pizza.
So I know there are a lot of you reading this who've eaten cold pizza for breakfast. Well, here's a way to have your pizza and have it warmed, too.
I also like the versatility of this dish, since it can be a breakfast, brunch or lunch dish all by itself. At lunch, I might serve a salad with it. For breakfast or brunch I might serve some thick sliced Canadian bacon.
In any case, I highly recommend this recipe. I'll add my recipe for savory pie crust at the end of this week's blog, but I promise not to tell if you buy the pre-made Pillsbury pie dough in the refrigerated section near the dairy products.
Here's the video, followed by the recipe(s):
1 Tbsp extra virgin olive oil
1/2 medium onion, finely chopped
3 large garlic cloves, minced
1 14 1/2 oz. can diced tomatoes (or use 3 to 4 fresh medium tomatoes, seeded and diced)
1 Tbsp tomato paste
2 pinches sugar
salt and pepper to taste
1 rosemary sprig
2 tsp fresh thyme leaves
2 large eggs
2 large egg yolks
3/4 cup whole milk
1/2 cup Swiss cheese, shredded
1/2 cup Parmesan cheese, shredded
Make a savory pie crust and insert into a tart pan and trim.
Heat the olive oil over medium heat in a wide large saucepan and add the onions. Cook until onion softens. Add some salt and pepper and continue to cook.
Pulse the tomatoes 4 or 5 times in a food processor. Do not process to long or they will turn pink.
Add garlic to the onions and cook until fragrant - about 30 seconds. Add the tomatoes and raise the heat. Add the tomato paste, sugar, salt and pepper, rosemary sprig and thyme and simmer, stirring often until the tomatoes cook down and smell fragrant. Remove any rosemary needles that may have detached from the sprig. Turn off the heat and allow the mixture to cool slightly.
Preheat the oven to 350. Beat the eggs and egg yolks in a large bowl. Brush the bottom of the pie crust with a small amount of the beaten eggs. Park bake the crust for about 10 minutes. Remove from the oven and cool slightly.
Beat the milk into the eggs. Add salt and pepper and beat well. Stir in the cheeses and the tomato sauce and mix until well combined.
Pour into the cooled crust and place back in the oven for 30 to 35 minutes or until set. Remove from the oven and allow to cool at least 15 minutes before slicing and serving.
PIE CRUST
1 1/2 cups all-purpose flour
1/2 tsp salt
1 Tbsp sugar
1/2 cup unsalted butter (use frozen, cut into chunks)
4 to 8 Tbsp ICE WATER
Combine flour, salt and sugar and butter in a food processor,
Pulse until mixture resembles small peas. Be careful not to over-process, as this will result in a tough pastry.
Add ice water, a tablespoon at a time, adding only enough until the dough comes together.
Gather the dough into a ball, then flatten it to form a disc. Wrap in plastic and refrigerate for at least a half hour before rolling out.
Wednesday, August 28, 2013
Thinking Inside the Box
Yes, yes, I know. The phrase is "thinking outside the box." But this week's recipe is one I found inside the box of Pepperidge Farm Puff Pastry Shells.
And I don't recall seeing anything on the outside of the box that would have alerted me to the fact that printed on the plain cardboard side of the box were some recipe gems. This week's is a perfect example and in a few more weeks, you'll see another one I found inside the same box.
The typical way to make mousse of any flavor takes time, patience and effort. This one is virtually effortless. But I did make a discovery that involves patience and I'll get to that in a little bit. Traditional mousses -- both sweet and savory -- involve the use of beaten egg whites and one must master the technique of folding those egg whites gently into the chocolate or the meat without deflating the egg whites.
The mousse illustrated in this week's recipe uses whipped cream. I suppose if you wanted to take a shortcut you could buy that artificial dessert topping sold in the freezer case, but freshly whipped cream is so much tastier. And it's not that hard to do. Your electric mixer does all of the work.
But here's another hint to faster and fluffier whipped cream: chill the bowl and the beaters in the freezer.
Let's also mention that white chocolate is not really chocolate at all because it contains no chocolate liquor and has no chocolate flavor. It's a mixture of cocoa butter, milk solids, sugar, lecithin and vanilla. Despite this, it still tastes really good, don't you agree?
Speaking of chocolate, my recipe calls for an ounce or two of bittersweet chocolate to be melted and drizzled over the mousse. I think three or four ounces would be better, as the additional volume makes a drizzling stream of dark chocolate easier to achieve.
As for that discovery -- I covered the leftover mousse with plastic wrap and put it in the fridge, thinking that I'd get to it later to make some additional desserts for the camera crew to take home. We never got to it the day I made it. But the next day, I checked to see if the mousse was still okay and it acquired the rich and airy texture that traditional mousses (the ones made with egg whites) get when made properly.
Make no mistake -- the original mousse in the puff pastry shell was delicious. The one left to "cure" in the fridge was, in my opinion, better. Another example of your patience being rewarded.
Here's the video, followed by the recipe. And once again -- thanks, Pepperidge Farm!
6 Puff Pastry shells
6 oz white chocolate
1/1/2 cups heavy cream (divided use)
1 to 2 ounces of semisweet chocolate
Bake and cool the puff pastry shells according to package directions.
Melt the white chocolate with a 1/4 cup of the cream over medium low heat, stirring to incorporate and until the chocolate is completely melted. Cool for 20 minutes until reaches room temperature.
In a chilled bowl with chilled beaters, place the remaining cream and whip it until it is between soft and stiff peaks. Fold about half of the whipped cream into the cooled white chocolate mixture to temper it, then gently fold in the rest of the whipped cream.
Melt the semi sweet chocolate over medium low heat until it is completely liquified.
Spoon the mousse into the pastry shells. Drizzle the melted dark chocolate over the mousse and serve.
Friday, August 16, 2013
Kitchen Guy: Sweetness from the Sea
Kitchen Guy: Sweetness from the Sea: I've always wondered why the word(s) for scallops in French is Saint Jacques . Coquille Saint Jacques was a very popular dish in the ol...
Sweetness from the Sea
http://widget.foodieblogroll.com/?BlogID=18145
I've always wondered why the word(s) for scallops in French is Saint Jacques. Coquille Saint Jacques was a very popular dish in the old classic French restaurants, usually nicely cooked scallops in a flavorful cream sauce and often served in a scallop shell.
Somewhere along the way, however, chefs discovered that a better way to cook sea scallops was to sear them in butter until they turn a deep golden brown. Once that has been achieved on both sides, the scallop is cooked through. Take it too far, though, and you have an overcooked scallop that is rubbery and not very good eating.
Ever since I began operating my own small cooking school, I've had every student learn to make seared sea scallops. I love this dish and it can stand on its own dressed with the butter used in the pan to cook it.
So I decided to bring the lesson to my TV viewers, my blog followers, my Facebook and Twitter friends, to demonstrate the proper way to sear sea scallops and, along the way, make a very flavorful sauce accompaniment, the classic beurre blanc.
Let us begin, then with the method for making the aforementioned sauce. There are actually two approaches to beurre blanc and it depends on what you're going to serve it with. The one I make in this episode is made with a full cup of dry white wine. If I were serving something that needed a little acidic component, then I would have made it with a half cup of dry white wine and a half cup of white wine vinegar.
You'll see in the episode, through time lapse, that the wine (and wine vinegar if using) are reduced until there is, perhaps, a scant tablespoon of liquid left in the pan. This is what is called au sec in cooking school, which means "almost dry." This is when the gradual addition of butter cubes -- a stick and a half in all -- begins.
Because you are using whole butter (as opposed to clarified), while keeping the sauce warm it may "break," meaning that the fat has separated from the milk solids and water content. A vigorous whisking usually resolves this. One other technique I show my students for keeping a sauce warm is to use the double boiler method, with the water at a bare simmer. The other important aspect of this is to drape a paper towel across the top of the saucepan and then place the lid on top of that. There will inevitably be some steam vapor created and the paper towel will absorb it, so that when you remove the lid, the water droplets will not fall into your sauce and dilute it.
I like to use a non-stick pan to sear my sea scallops. It's just one measure I take to ensure that the tender flesh of the scallop does not stick to the pan, even though I'm using a fair amount (3 Tablespoons) of butter. While the first side of the scallop is cooking, you will see the edges begin to brown and it's okay to use a pair of tongs to lift the scallop slightly to check the progress of the browning. Once you see that golden brown color over most of the surface of the scallop, it's time to turn and do the same on the other side.
By the way, you can make beurre rouge using red wine (and red wine vinegar if appropriate). The quantities and method stay the same.
Here's the video, followed by the recipe for both beurre blanc and seared sea scallops:
2 shallots, finely diced
1 1/2 sticks unsalted butter, cut into 1 Tbsp pats
1/2 cup dry white wine
dash cayenne pepper
1 pound sea scallops, abductor muscle removed
3 Tbsp unsalted butter
To make the beurre blanc, melt 2 Tbsp butter in a large skillet. Add shallots, wine and cayenne. Simmer over medium heat until the liquid has almost evaporated. Add the rest of the pats of butter, one at a time and let melt before adding the next pat of butter.
Strain sauce into a small pot and keep warm. A double boiler works well.
To make the scallops, be sure the scallops are completely patted dry. Salt and pepper each side. Melt 3 Tbsp butter in a non-stick pan. When butter is completely melted and bubbling, add scallops and cook on first side until golden brown. Carefully turn each scallop and cook until the second side is golden brown.
Place about 2 Tbsp of beurre blanc on appetizer plates, Place 3 or 4 scallops on top of sauce and serve, garnished with fresh chopped parsley.
Wednesday, August 7, 2013
Hungry for Hungarian
This cook's gene pool has Hungarian in it and so this week I have recreated a dish from my childhood.
When one thinks of Hungarian food, only two come to mind (we'll get to the liquid refreshment part of this week's blog soon enough): Goulash -- basically a beef stew; and Paprikash, basically a chicken stew flavored with Hungary's most well known spice, paprika.
Capcicum annuum is the scientific name of the red bell pepper used in Hungary to make paprika and, depending on your taste, you can have it mild or spicy. The smoked variety of paprika which has come into culinary favor over the past several years is actually a Spanish creation.
I used a whole chicken, cut up, excluding the wings and the back. I cut the breasts in half so that I had a total of eight whole pieces, bones and skin included, for my stew. I dredged the chicken parts in seasoned flour and browned them well on all sides. I'm a big believer in layering flavors and the browning of the chicken is an important layer of flavor in my playbook.

After browning, I took out the chicken and covered it with foil to keep it somewhat warm while I caramelized a traditional mirepoix (onion, carrots and celery) with the addition of some red bell pepper and a jalapeño because I could not find the spicy variety of the Hungarian chili pepper. I also added salt, pepper and paprika.
After caramelization, the chicken goes back into the pot along with some tomato paste (to help reinforce the red color you want in the sauce) along with 3 cups of chicken stock. The mixture should come to a boil, then be reduced to a simmer, covered and cook for about a half hour until the chicken is completely cooked through.
The chicken goes into the serving vessel (used something that has sides, because there is a lot of sauce). The sauce in the pot gets strained and the solids are discarded, as they have given up every last bit of flavor they had to offer. I then raised the heat to reduce the sauce and thicken it some. You can help it thicken if you'd like with a cornstarch slurry or even some Wondra.
Then pour it over the chicken and you've got one delicious Hungarian treat.
Oh yes, that liquid refreshment referred to previously actually is best after dinner. The brand is Slivovitz and it's actually a plum brandy -- something else unique to Hungary.
Here's the video, followed by the recipe:
3 Tbsp olive oil
1 chicken, cut up (about a 3 to 4 lb bird)
salt and pepper to taste
1/2 cup flour
4 garlic cloves, peeled and crushed
2 medium red bell peppers, seeded and finely chopped
2 celery stalks, finely chopped
1 large carrot, finely chopped
1 medium yellow onion, finely chopped
1 medium chili pepper (Holland, serrano, or red jalapeño, seeded and chopped)
2 Tbsp tomato paste
2 tsp paprika (sweet is preferred, but you can use hot)
1 tsp ground cumin
3 cups chicken stock
3 Tbsp parsley, finely chopped
Heat oil in a 6 quart saucepan over medium high heat. Season chicken pieces with salt and pepper and dredge in flour Add chicken to pan and cook, turning once, until browned on both sides, about 15 minutes. Transfer chicken to a plate and set aside.
Add garlic, bell peppers, celery, carrot, onion and chili and cook, stirring occasionally, until soft, about 10 minutes. Add tomato paste, paprika and cumin and cook, stirring until lightly caramelized, about 2 minutes. Return chicken to pan along with chicken stock and bring to a boil Reduce heat to medium low and cook at a simmer, covered, until chicken is cooked through, about 45 minutes.
Transfer chicken to a serving platter, and pour cooking liquid through a strainer into a bowl. Discard solids. Season liquid with salt and pepper and pour over chicken. Garnish with chopped parsley.
Tuesday, July 23, 2013
Chicken Divan - A Classic Recreated
French technique and cuisine is de rigeur in culinary school. All of your knife cuts have French names; many cooking methods are French. And there are only two answers that are acceptable in the kitchen of a French chef: Oui, Chef; and Non, Chef!
When it comes to technique, culinary students are never in doubt: either they embrace it or they simply endure it until they get out of school.
I've encountered similar feelings toward French cuisine when cooking for clients or heading up restaurant kitchens. And most of the objections I hear are centered on the richness of the food, particularly the sauces. They are perceived to be made from mounds of butter and buckets of cream.
I set out to disprove that a couple of months ago when I cooked Chicken in Vinegar Sauce, adapting a recipe from the famous French chef, Jacques Pepin. There wasn't a hint of butter or a drop of cream. Rather we used the piquant flavor of red wine vinegar tamed by some other ingredients to create a luxurious vegetable sauce.
And once again, this week, to those who turn up their noses at French food, I say, "Au contrere!"
Chicken Divan my way uses only a couple of tablespoons of butter and a scant quarter cup of cream. The primary ingredient in this sauce is chicken stock. I used the butter with flour to create a roux to thicken the sauce and the cream gave the sauce some body.
There is one other technique in this recipe I'd like to call to your attention and that is blanching and shocking vegetables in order to set the color. In this recipe I use broccoli with longer stems than I might use in other recipes. I cooked the florets in boiling salted water just until they were tender and then "shocked" them in ice water to stop the cooking and set the brilliant green color.
I highly recommend this for two reasons: The first I already gave you and that is that the color is important as a part of the presentation of the dish. That's because we eat with our eyes first. The second is that the vegetable is not overcooked, soggy or limp. Rather it is crisp and retains that vegetal flavor that we look for in perfectly cooked broccoli.
Here's the video, followed by the recipe:
1 medium bunch broccoli
1 14 0z can chicken broth (low sodium)
4 Tbsp unsalted butter, divided
3 Tbsp all-purpose flour
1/4 tsp salt
dash white pepper
1/4 cup cream
1/3 cup Parmesan cheese, shredded
1 1/2 Tbsp dry white wine
4 large chicken breast halves, boneless and skinless
Cut broccoli into long florets with stems. Boil briefly in lots of salted water just until crisp and tender. Drain, then refresh in ice water to set the color. Drain again and pat dry.
In a small saucepan, boil chicken broth until reduced by half to about 1 cup.
In a medium skillet saute chicken breasts in a 2 Tbsp butter until each side is nicely browned. Remove chicken and add remaining butter and blend with flour to make a roux. Add salt and white pepper. Add reduced chicken broth and cook, stirring until mixture thickens and bubbles. Stir in the cream, the Parmesan cheese and wine. Remove from heat.
Serve chicken breasts, placing broccoli on top and pour sauce over the meat and vegetables.
When it comes to technique, culinary students are never in doubt: either they embrace it or they simply endure it until they get out of school.
I've encountered similar feelings toward French cuisine when cooking for clients or heading up restaurant kitchens. And most of the objections I hear are centered on the richness of the food, particularly the sauces. They are perceived to be made from mounds of butter and buckets of cream.
I set out to disprove that a couple of months ago when I cooked Chicken in Vinegar Sauce, adapting a recipe from the famous French chef, Jacques Pepin. There wasn't a hint of butter or a drop of cream. Rather we used the piquant flavor of red wine vinegar tamed by some other ingredients to create a luxurious vegetable sauce.
And once again, this week, to those who turn up their noses at French food, I say, "Au contrere!"
Chicken Divan my way uses only a couple of tablespoons of butter and a scant quarter cup of cream. The primary ingredient in this sauce is chicken stock. I used the butter with flour to create a roux to thicken the sauce and the cream gave the sauce some body.
There is one other technique in this recipe I'd like to call to your attention and that is blanching and shocking vegetables in order to set the color. In this recipe I use broccoli with longer stems than I might use in other recipes. I cooked the florets in boiling salted water just until they were tender and then "shocked" them in ice water to stop the cooking and set the brilliant green color.
I highly recommend this for two reasons: The first I already gave you and that is that the color is important as a part of the presentation of the dish. That's because we eat with our eyes first. The second is that the vegetable is not overcooked, soggy or limp. Rather it is crisp and retains that vegetal flavor that we look for in perfectly cooked broccoli.
Here's the video, followed by the recipe:
Chicken Divan
1 medium bunch broccoli
1 14 0z can chicken broth (low sodium)
4 Tbsp unsalted butter, divided
3 Tbsp all-purpose flour
1/4 tsp salt
dash white pepper
1/4 cup cream
1/3 cup Parmesan cheese, shredded
1 1/2 Tbsp dry white wine
4 large chicken breast halves, boneless and skinless
Cut broccoli into long florets with stems. Boil briefly in lots of salted water just until crisp and tender. Drain, then refresh in ice water to set the color. Drain again and pat dry.
In a small saucepan, boil chicken broth until reduced by half to about 1 cup.
In a medium skillet saute chicken breasts in a 2 Tbsp butter until each side is nicely browned. Remove chicken and add remaining butter and blend with flour to make a roux. Add salt and white pepper. Add reduced chicken broth and cook, stirring until mixture thickens and bubbles. Stir in the cream, the Parmesan cheese and wine. Remove from heat.
Serve chicken breasts, placing broccoli on top and pour sauce over the meat and vegetables.
Subscribe to:
Posts (Atom)